原本撰寫 UEFI Application with C
關於網路部份我使用的是 HP porting 的 CurlLib
但這裡並沒有加上 HTTPS 的支援
CurlLib可以使用多種 SSL Lib
因為 UDK2014 在 CryptoLib porting 的是 openssl-0.9.8w
故我在這裡是選擇在 CurlLib 中打開 openssl
底下是我的步驟及遇到的問題,還有個人認為的解決方案
0. 使用 VC and UDK2014
1. 依照 "CryptoPkg\Library\OpensslLib\Patch-HOWTO.txt",安裝 openssl
2. Modify "HpNetworkPkg\HpNetworkPkg.dsc",add "OpensslLib|CryptoPkg/Library/OpensslLib/OpensslLib.inf" in "[LibraryClasses]"
3. Modify "HpNetworkPkg\HpNetworkPkg.dec",add "../CryptoPkg/Include" in "[Includes]"
4. Modify "HpNetworkPkg\Library\CurlLib\lib\CurlLib.inf",add "CryptoPkg/CryptoPkg.dec" in "[Packages]" and "OpensslLib" in "[LibraryClasses]"
5. Modify "HpNetworkPkg\Library\CurlLib\lib\CurlLib.inf",add "/DUSE_SSLEAY /DUSE_OPENSSL" in "MSFT:*_*_*_CC_FLAGS"
此時會遇到很多 SSL 開頭函數的 Link Error
之所以會有這些問題是 UDK2014 雖然有 porting openssl-0.9.8w
但在 "OpensslLib.inf" 並沒有去編譯相關檔案
舉例來說 "CryptoPkg\Library\OpensslLib\openssl-0.9.8w\ssl" 裡的檔案都不在 "OpensslLib.inf"
故我認為有 2 個方式可以解決
1. Modify "OpensslLib.inf",編譯相關檔案,但我認為這是大工程
2. 使用 UEFI 原生的 HTTP_PROTOCOL,但不確定有沒有支援 HTTPS
留下測試的相關步驟以做記錄
2018年7月12日 星期四

2018年7月6日 星期五
UEFI Application - Python 3rd modules
今天想要試試如何在 UEFI 使用 Python 3rd modules
故挑了一個常用的 requests module 來測試
底下是相關的步驟
我使用的是 UDK 2014
1. pip install requests
2. pip show requests
3. copy step2 的相關 modules to EFI\StdLib\lib\python.27\site-packages
4. uncomment "default_socket_options = [(socket.IPPROTO_TCP, socket.TCP_NODELAY, 1)]" in site-packages\urllib3\connection.py, and add "default_socket_options = []"
5. open "signal", "unicodedata", "zipimport", "zlib" in Python\Efi\config.c
6. define "WITH_THREAD" in Python\X64\pyconfig.h
7. add "Python-$(PYTHON_VERSION)/Modules/threadmodule.c" and "Python-$(PYTHON_VERSION)/Python/thread.c" in Python\PythonCore.inf
8. add your thread implement for uefi or you can use mine below. if this file is named "xxxx.h", remember to add "#include "xxxx.h" in Python\Python-2.7.2\Python\thread.c
9. rebuild Python.efi
故挑了一個常用的 requests module 來測試
底下是相關的步驟
我使用的是 UDK 2014
1. pip install requests
2. pip show requests
3. copy step2 的相關 modules to EFI\StdLib\lib\python.27\site-packages
4. uncomment "default_socket_options = [(socket.IPPROTO_TCP, socket.TCP_NODELAY, 1)]" in site-packages\urllib3\connection.py, and add "default_socket_options = []"
5. open "signal", "unicodedata", "zipimport", "zlib" in Python\Efi\config.c
6. define "WITH_THREAD" in Python\X64\pyconfig.h
7. add "Python-$(PYTHON_VERSION)/Modules/threadmodule.c" and "Python-$(PYTHON_VERSION)/Python/thread.c" in Python\PythonCore.inf
8. add your thread implement for uefi or you can use mine below. if this file is named "xxxx.h", remember to add "#include "xxxx.h" in Python\Python-2.7.2\Python\thread.c
9. rebuild Python.efi
/*
 * Initialization.
 */
static void
PyThread__init_thread(void)
{
}

/*
 * Thread support.
 */
static int g_id = 123;
long
PyThread_start_new_thread(void (*func)(void *), void *arg)
{
    return g_id;
}

long
PyThread_get_thread_ident(void)
{
    return g_id;
}

void
PyThread_exit_thread(void)
{
}

/*
 * Lock support.
 */

typedef struct {
    char             locked; /* 0=unlocked, 1=locked */
} thread_lock;


PyThread_type_lock
PyThread_allocate_lock(void)
{
    thread_lock *lock = (thread_lock*)malloc(sizeof(thread_lock));
    lock->locked = 0;

    return (PyThread_type_lock)lock;
}

void
PyThread_free_lock(PyThread_type_lock lock)
{
    thread_lock *p = (thread_lock*)lock;

    free((void*)p);
}

int
PyThread_acquire_lock(PyThread_type_lock lock, int waitflag)
{
    thread_lock *p = (thread_lock*)lock;

    int success = p->locked == 0;

    if ( !success && waitflag ) {
        int count = 0;
        while ( p->locked ) {
            count++;
        }
        success = 1;
    }

    if (success) p->locked = 1;
    return success;
}

void
PyThread_release_lock(PyThread_type_lock lock)
{
    thread_lock *p = (thread_lock*)lock;
    p->locked = 0;
}
2018年6月6日 星期三
amazon EC2 預留執行個體初體驗 - 6
今天心血來潮想使用中華電信 4G SSH 進 東京 EC2
只能說結果真是慘不忍睹
難怪之前遠端桌面很不順
連 SSH 都不太行了
雖然我是用 4G
但我想中華光纖應該也好不到哪去

只能說結果真是慘不忍睹
難怪之前遠端桌面很不順
連 SSH 都不太行了
雖然我是用 4G
但我想中華光纖應該也好不到哪去

transfer local git repository history to new remote repository
有時候在寫些小程式時
不太想為了這個開個 github repository
但又想享用版本控管的功能
此時便可以開個 local git repository
要備份時就複製整個資料夾即可
等到小程式寫到一定程度
感覺可以放上 github 時
此時就會面臨想要保留 local git history 的問題
查了一下
原來 git 只要簡單下幾個指令即可
1. git remove -v
此步驟是確定這個 local git 還未指定過其他的 remote
2. git remote add name url
此步驟是把 remote url 取名為 name,之後就可以針對它 push
注意:如果是拿 github 或是一個其他地方現有的專案,則是使用改變
不太想為了這個開個 github repository
但又想享用版本控管的功能
此時便可以開個 local git repository
要備份時就複製整個資料夾即可
等到小程式寫到一定程度
感覺可以放上 github 時
此時就會面臨想要保留 local git history 的問題
查了一下
原來 git 只要簡單下幾個指令即可
1. git remove -v
此步驟是確定這個 local git 還未指定過其他的 remote
2. git remote add name url
此步驟是把 remote url 取名為 name,之後就可以針對它 push
注意:如果是拿 github 或是一個其他地方現有的專案,則是使用改變
(下面只是例子,要變的路徑是 HTTP github 路徑,公司要用的要看公司的 URL 格式)
git remote set-url origin https://github.com/USERNAME/OTHERREPOSITORY.git
3. git remote -v
此指令會看到步驟 2 的 url and name
4. git push name master
此指令會把 local 的 master push 到 remote 的 name,遠端便會看到相關的 history
3. git remote -v
此指令會看到步驟 2 的 url and name
4. git push name master
此指令會把 local 的 master push 到 remote 的 name,遠端便會看到相關的 history
2018年5月22日 星期二
amazon EC2 預留執行個體初體驗 - 5
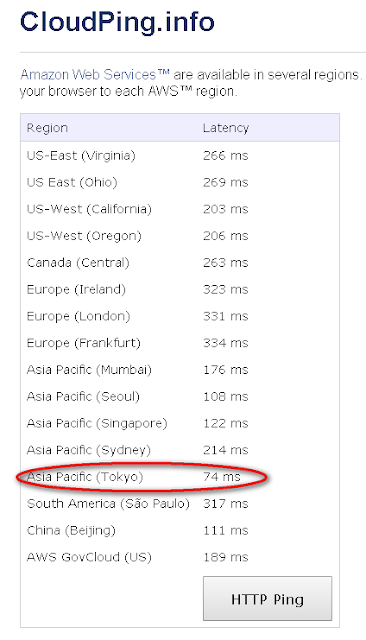
前篇文章提到東京 EC2 到台灣會有一定的網路延遲
之前是憑印象選擇東京
今天偶然看到可以測試速度的網站
就來確認東京是否是最佳解
嗯,看起來應該是沒錯XD
之前是憑印象選擇東京
今天偶然看到可以測試速度的網站
就來確認東京是否是最佳解
嗯,看起來應該是沒錯XD

2018年5月18日 星期五
amazon EC2 預留執行個體初體驗 - 4
在 EC2 上執行了 WebServer
並丟了一些測試網頁
從下圖中可以看出
TTFB (Time To First Byte) 的時間比較久
應該還可以再分析什麼
TTFB 的第 1 個 byte 是有包含 header 的
但使用者從瀏覽器看到的是整個 page (rendered)
故 TTFB 的時間很快,不代表使用者看到 page 的時間就很快
不過這也表示了,東京 EC2 到我的測試電腦有一定的網路延遲

並丟了一些測試網頁
從下圖中可以看出
TTFB (Time To First Byte) 的時間比較久
應該還可以再分析什麼
TTFB 的第 1 個 byte 是有包含 header 的
但使用者從瀏覽器看到的是整個 page (rendered)
故 TTFB 的時間很快,不代表使用者看到 page 的時間就很快
不過這也表示了,東京 EC2 到我的測試電腦有一定的網路延遲

amazon EC2 預留執行個體初體驗 - 3
網路真可怕
最近 GPON 家用路由器被發現有漏洞
CVE-2018-10561 and CVE-2018-10562
我新開的 EC2 只要執行Web Server
就發現真的有不明人士在掃
這個漏洞簡單來說
就是有人會去掃主機是否有開啟相關服務
並試著在 URL 加上字串
1. ?images/
2. /GponForm/diag_FORM?images/
如果剛好用到有問題的路由器
便可以執行一些危險指令
有圖有真相

最近 GPON 家用路由器被發現有漏洞
CVE-2018-10561 and CVE-2018-10562
我新開的 EC2 只要執行Web Server
就發現真的有不明人士在掃
這個漏洞簡單來說
就是有人會去掃主機是否有開啟相關服務
並試著在 URL 加上字串
1. ?images/
2. /GponForm/diag_FORM?images/
如果剛好用到有問題的路由器
便可以執行一些危險指令
有圖有真相

訂閱:
文章 (Atom)