使用 node.js 時,如果想要一口氣刪除所有的 module,可以使用下列方式
進到 node_modules 資料夾
使用 PowerShell 執行下列命令
npm uninstall (Get-ChildItem).Name
2016年8月24日 星期三

2016年8月19日 星期五
nginx 設定 PHP
假設在 nginx 設定 php 遇到奇怪的問題
比如 query string , path info 等值取不到
大部份都是設定檔的問題
其中順序也會影響
留著備忘參考
location ~ [^/]\.php(/|$) {
fastcgi_split_path_info ^(.+?\.php)(/.*)$;
if (!-f $document_root$fastcgi_script_name) {
return 404;
}
fastcgi_buffer_size 128k;
fastcgi_buffers 256 16k;
fastcgi_busy_buffers_size 256k;
fastcgi_temp_file_write_size 256k;
fastcgi_read_timeout 3610;
include fastcgi_params;
fastcgi_param SCRIPT_FILENAME $document_root$fastcgi_script_name;
fastcgi_param SCRIPT_NAME $fastcgi_script_name;
fastcgi_param PATH_INFO $fastcgi_path_info;
fastcgi_index index.php;
fastcgi_pass 127.0.0.1:9090;
比如 query string , path info 等值取不到
大部份都是設定檔的問題
其中順序也會影響
留著備忘參考
location ~ [^/]\.php(/|$) {
fastcgi_split_path_info ^(.+?\.php)(/.*)$;
if (!-f $document_root$fastcgi_script_name) {
return 404;
}
fastcgi_buffer_size 128k;
fastcgi_buffers 256 16k;
fastcgi_busy_buffers_size 256k;
fastcgi_temp_file_write_size 256k;
fastcgi_read_timeout 3610;
include fastcgi_params;
fastcgi_param SCRIPT_FILENAME $document_root$fastcgi_script_name;
fastcgi_param SCRIPT_NAME $fastcgi_script_name;
fastcgi_param PATH_INFO $fastcgi_path_info;
fastcgi_index index.php;
fastcgi_pass 127.0.0.1:9090;
Golang on Ubuntu
假設在 Ubuntu 安裝完 Golang
可以用 go env GOROOT
來確定 golang 安裝的路徑
接著執行下面指令,就可以開始使用 golang 了
export GOROOT=/usr/loca/golang-1.6(假設查出來是此目錄)
export GOPATH=$HOME/GoHome
可以用 go env GOROOT
來確定 golang 安裝的路徑
接著執行下面指令,就可以開始使用 golang 了
export GOROOT=/usr/loca/golang-1.6(假設查出來是此目錄)
export GOPATH=$HOME/GoHome
export PATH=$PATH:$GOROOT/bin:$GOPATH/bin
2016年8月16日 星期二
Alternate Domain Names
一般來說,在設定 CDN 時有 2 種方式:
1. 直接將 CDN 給的 domain 拿來做 URL,假設 CDN 的 domain 是 abc.com,則要做 CDN 的檔案的 URL 都是 abc.com/xxxx。
2. 仍然使用自己的 domain,假設自己的 domain 是 def.com,需要在 DNS 服務提供者建立一筆 CNAME record,此時 def.com/xxx 的 URL 便會導向到 abc.com/xxx。
1. 直接將 CDN 給的 domain 拿來做 URL,假設 CDN 的 domain 是 abc.com,則要做 CDN 的檔案的 URL 都是 abc.com/xxxx。
2. 仍然使用自己的 domain,假設自己的 domain 是 def.com,需要在 DNS 服務提供者建立一筆 CNAME record,此時 def.com/xxx 的 URL 便會導向到 abc.com/xxx。
2016年7月29日 星期五
Android OTA 差分包
1. Copy "/source/android/out/target/product/xxx/obj/PACKAGING/target_files_intermediates/xxx.zip" to old.zip
2. Modify source code and rebuild project
3. Copy "/source/android/out/target/product/xxx/obj/PACKAGING/target_files_intermediates/xxx.zip" to new.zip
4. Move to "/source/android" path, create "OTA" folder, copy old.zip and new.zip to this folder
5. Run "./build/tools/releasetools/ota_from_target_files -i OTA/old.zip OTA/new.zip OTA/diff.zip"
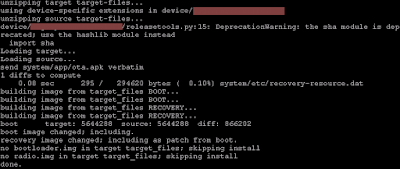
6. If there is no error, you will see the below message
1 的檔案是製作 OTA 檔案過程中的產物,差分包需要這個才能產生 patch,故不能拿平常 build 出來的 OTA 檔案。
另外,由於是用 old.zip 比較出來的差分包,故設備上的版本需和 old.zip 一樣,不然升級會失敗。
2. Modify source code and rebuild project
3. Copy "/source/android/out/target/product/xxx/obj/PACKAGING/target_files_intermediates/xxx.zip" to new.zip
4. Move to "/source/android" path, create "OTA" folder, copy old.zip and new.zip to this folder
5. Run "./build/tools/releasetools/ota_from_target_files -i OTA/old.zip OTA/new.zip OTA/diff.zip"
6. If there is no error, you will see the below message
1 的檔案是製作 OTA 檔案過程中的產物,差分包需要這個才能產生 patch,故不能拿平常 build 出來的 OTA 檔案。
另外,由於是用 old.zip 比較出來的差分包,故設備上的版本需和 old.zip 一樣,不然升級會失敗。

2016年7月22日 星期五
grep examples
# 挑出超過 1000 ms 的資料
110.txt: 100% 800 (longest request)
111.txt: 100% 2538 (longest request)
112.txt: 100% 1209 (longest request)
113.txt: 100% 2341 (longest request)
114.txt: 100% 829 (longest request)
115.txt: 100% 2506 (longest request)
116.txt: 100% 829 (longest request)
117.txt: 100% 2372 (longest request)
118.txt: 100% 862 (longest request)
119.txt: 100% 5681 (longest request)
120.txt: 100% 803 (longest request)
ANS: grep -E "%\s{3}\S"
前面一定要加入 % ,不然就如圖片所示,有 4個空白的列也會符合。

110.txt: 100% 800 (longest request)
111.txt: 100% 2538 (longest request)
112.txt: 100% 1209 (longest request)
113.txt: 100% 2341 (longest request)
114.txt: 100% 829 (longest request)
115.txt: 100% 2506 (longest request)
116.txt: 100% 829 (longest request)
117.txt: 100% 2372 (longest request)
118.txt: 100% 862 (longest request)
119.txt: 100% 5681 (longest request)
120.txt: 100% 803 (longest request)
ANS: grep -E "%\s{3}\S"
前面一定要加入 % ,不然就如圖片所示,有 4個空白的列也會符合。
The Apache Hints of Windows Platform
Apache 2.4.23
# Check Compiled modules
C:\Apache\bin>httpd -l
Compiled in modules:
core.c
mod_win32.c
mpm_winnt.c
http_core.c
mod_so.c
# 記憶體調校
如果做壓力測試時,發現 httpd 的虛擬記憶體不斷的上升,此時可以調整以下參數
1. Keep Alive:
關掉 Keep Alive,或是減少 MaxKeepAliveRequests 以及減少 KeepAliveTimeout,Apache 為了保持連線,會保留記憶體而未釋放。
2. MaxConnectionsPerChild (after 2.3.9) or MaxRequestsPerChild (before 2.3.9):
Windows 的 Apache 共有 2 個 httpd.exe process,其中 1個是子進程,負責處理所有的 requests。當設置這 2 個參數後,如果達到 Max 的 Connections or Requests,母進程便會殺掉子進程,因此就能釋放原本被佔用的記憶體,此預設值為 0 表示無限制。
# AcceptPathInfo
This directive controls whether requests that contain trailing pathname information that follows an actual filename (or non-existent file in an existing directory) will be accepted or rejected.
example: /test/here.html/more
如果啟用的話,則 /more 便會視為 PATH_INFO,此預設值為 Default,處理 scripts 時 accepted,其他則 rejected。
# Check Compiled modules
C:\Apache\bin>httpd -l
Compiled in modules:
core.c
mod_win32.c
mpm_winnt.c
http_core.c
mod_so.c
# 記憶體調校
如果做壓力測試時,發現 httpd 的虛擬記憶體不斷的上升,此時可以調整以下參數
1. Keep Alive:
關掉 Keep Alive,或是減少 MaxKeepAliveRequests 以及減少 KeepAliveTimeout,Apache 為了保持連線,會保留記憶體而未釋放。
2. MaxConnectionsPerChild (after 2.3.9) or MaxRequestsPerChild (before 2.3.9):
Windows 的 Apache 共有 2 個 httpd.exe process,其中 1個是子進程,負責處理所有的 requests。當設置這 2 個參數後,如果達到 Max 的 Connections or Requests,母進程便會殺掉子進程,因此就能釋放原本被佔用的記憶體,此預設值為 0 表示無限制。
# AcceptPathInfo
This directive controls whether requests that contain trailing pathname information that follows an actual filename (or non-existent file in an existing directory) will be accepted or rejected.
example: /test/here.html/more
如果啟用的話,則 /more 便會視為 PATH_INFO,此預設值為 Default,處理 scripts 時 accepted,其他則 rejected。
訂閱:
文章 (Atom)