pretty code

2017年9月29日 星期五

UEFI Application - load protocol

今天需要在 app 中讀取 CMOS 資訊
經同事建議後,使用 EFI_CPU_IO_PROTOCOL 來讀取它

由於完全不懂 BIOS 概念
網路上也找不到相關資料
在翻遍了 UDK2014 code base 後
搞了 2 個小時才搞定

希望寫出來的東西不會誤導大眾

xxx.inf

[Protocols]
    gEfiCpuIoProtocolGuid

xxx.c

#include <Protocol/CpuIo.h>
#include <Library/UefiBootServicesTableLib.h>
#include <stdio.h>

EFI_CPU_IO_PROTOCOL *mCpuIo = NULL;

void testReadCMOS()
{
    EFI_STATUS Status;
    UINT8 addr;
    UINT8 data;
    
    Status = gBS->LocateProtocol(&gEfiCpuIoProtocolGuid, NULL, (VOID **)&mCpuIo);  
    if (Status != EFI_SUCCESS) {
        return;
    }
    
    addr = 0x30;
    Status = mCpuIo->Io.Write(
        mCpuIo,
        EfiCpuIoWidthUint8,
        0x70,
        1,
        &addr
    );
    
    if (Status != EFI_SUCCESS) {
        return;
    }
    
    Status = mCpuIo->Io.Read(
        mCpuIo,
        EfiCpuIoWidthUint8,
        0x71,
        1,
        &data
    );
    
    if (Status != EFI_SUCCESS) {
        return;
    }
    
    printf("CMOS 0x30=%X", data); 
}

2017年9月18日 星期一

Golang sync.WaitGroup 備忘

有時候身上有太多專案不是一件好事
特別是當每個專案用的語言都不一樣時

最近在忙一個專案
使用的語言是 C
故這一陣子比較少用 Golang

等到這個專案要開始寫模擬程式時
又要切回 Golang
一時之間還真的轉不過來

就拿 sync.WaitGroup 來說
這是用來控制 goruntime 正常結束的 struct

不過常常隔一陣子寫 Golang
就會把它當成特殊 type 變數
故會忘記傳指標進去 goruntime
導致程式無法正常結束

於是決定來 trace 一下 source code
好加深印象,以後就不會忘記了

我們先來看 Go/src/sync/waitgroup.go
很明顯的是一個 struct 無誤
 
// A WaitGroup waits for a collection of goroutines to finish.
// The main goroutine calls Add to set the number of
// goroutines to wait for. Then each of the goroutines
// runs and calls Done when finished. At the same time,
// Wait can be used to block until all goroutines have finished.
//
// A WaitGroup must not be copied after first use.
type WaitGroup struct {
 noCopy noCopy

 // 64-bit value: high 32 bits are counter, low 32 bits are waiter count.
 // 64-bit atomic operations require 64-bit alignment, but 32-bit
 // compilers do not ensure it. So we allocate 12 bytes and then use
 // the aligned 8 bytes in them as state.
 state1 [12]byte
 sema   uint32
}

接著再來看它提供的 method Add( )
其宣告形式也是一個指標
 
func (wg *WaitGroup) Add(delta int) {
 statep := wg.state()
 if race.Enabled {
  _ = *statep // trigger nil deref early
  if delta < 0 {
   // Synchronize decrements with Wait.
   race.ReleaseMerge(unsafe.Pointer(wg))
  }
  race.Disable()
  defer race.Enable()
 }
        ...
}

希望以後就不會忘記了

2017年9月12日 星期二

happy-go-lucky 計算下班時間

以後不知道要寫什麼文章
就來寫些小程式誕生的故事

今天第一個故事就是計算下班時間的小工具

雖然說身為 RD 的我們不太可能準時下班
但偶爾也會有早來想要早點下班運動的時候

很不巧的我們的刷卡記錄要明天才能查詢
雖然我們可以偶爾不做滿 8個小時
但奉公守法的我還是覺得很不習慣

於是就想要知道大概的上班時間
這樣才能確定要幾點才能下班

後來靈機一動
想要利用電腦開機的時間來當做刷卡時間
理論上刷卡時間一定會在電腦開機之前
故以這個時間當基準一定不會有錯

註:不管是什麼機器,時間都需要校時
以我以前 MIS 的經驗,刷卡機會跟資料庫主機對時
而資料庫主機又會跟 AD Server 對時
AD Server 又會跟外部服務對時
這樣才能確保大家的時間都一致

以 Windows來說
我們可以去 事件檢視器 -> Windows 記錄 -> 系統
尋找一個事件檢視碼為 12 的事件
裡面就會有我們開機的時間

這時候利用 Google 我們查到了 "wevtutil" 這個指令
它可以用來查詢相關的事件並指定 Filter 條件(時間)
由於這個指令會把所有事件都查詢出來
故我們再加上 Find 這個指令
只挑選出 EventID 12 的行數
wevtutil qe system  "/q:*[System[TimeCreated[@SystemTime>='2017-09-10T00:00:00']]]" | 
find /N "12</EventID>"

另外一種解法
EventID 12 有一個特殊欄位
只有 EventID 12 才有
wevtutil qe system /q:Event[EventData[Data[@Name='StartTime']>'2017-09-10T00:00:00']]

出來的結果如下
<Event xmlns='http://schemas.microsoft.com/win/2004/08/events/event'>
<System>
<Provider Name='Microsoft-Windows-Kernel-General' Guid='{A68CA8B7-004F-D7B6-A698-07E2DE0F1F5D}'/>
<EventID>12</EventID>
<Version>0</Version>
<Level>4</Level>
<Task>0</Task>
<Opcode>0</Opcode>
<Keywords>0x8000000000000000</Keywords>
<TimeCreated SystemTime='2017-09-12T01:30:41.749600400Z'/>
<EventRecordID>302816</EventRecordID>
<Correlation/>
<Execution ProcessID='4' ThreadID='8'/>
<Channel>System</Channel>
<Computer> xxxxx </Computer>
<Security UserID='S-1-5-18'/>
</System>
<EventData>
<Data Name='MajorVersion'>6</Data>
<Data Name='MinorVersion'>1</Data>
<Data Name='BuildVersion'>7601</Data>
<Data Name='QfeVersion'>23807</Data>
<Data Name='ServiceVersion'>1</Data>
<Data Name='BootMode'>0</Data>
<Data Name='StartTime'>2017-09-12T01:30:41.125599300Z</Data>
</EventData>
</Event>

好了,食材都有了,就讓我們開始下廚吧

我們利用 Golang os/exec, time, strings 等 package
就可以簡單炒出一盤好菜了

package main

import (
    "fmt"
    "log"
    "os/exec"
    "strings"
    "time"
)

const workTime = 8 * 60 + 75

func getCMDResult(today string) (string, error) {
    subcmd := fmt.Sprintf("wevtutil qe system /q:Event[EventData[Data[@Name='StartTime']^>'%s']]", today)
    cmd := exec.Command("cmd", "/C", subcmd)

    out, err := cmd.Output()
    if err != nil {
        return "", err
    }

    return string(out), nil
}

func getStartTime(log string) string {
    pattern := "'StartTime'>"

    i := strings.Index(log, pattern)
    if i >= 0 {
        start := i + len(pattern)
        out := log[start:start+30]
        return out
    }

    return ""
}

func getHumanTime(t time.Time) string {
    return fmt.Sprintf(
        "%04d-%02d-%02d %02d:%02d",
        t.Year(),
        t.Month(),
        t.Day(),
        t.Hour(),
        t.Minute(),
    )
}

func printWorkTime(startTime string) {
    t1, err := time.Parse(time.RFC3339, startTime)
    if err != nil {
        fmt.Println(err)
        return
    }

    fmt.Println("")
    fmt.Printf("clock in  : %s \n", getHumanTime(t1.Local()))
    fmt.Printf("clock out : %s \n", getHumanTime(t1.Add(time.Duration(workTime)*time.Minute).Local()))
}

func main() {
    t1 := time.Now()
    t2 := time.Date(t1.Year(), t1.Month(), t1.Day(), 0, 0, 0, 0, time.FixedZone("UTC", 0))

    out, err := getCMDResult(t2.Format(time.RFC3339))
    if err != nil {
        log.Fatal(err)
    }

    startTime := getStartTime(out)

    if startTime != "" {
        printWorkTime(startTime)
        return
    }

    fmt.Println("Can't get start time in Windows event log")
}


https://github.com/tylpk1216/go-clockout
2017年9月8日 星期五

大台北行政區圖 DIY

身為一個專業的 RD,最受歡迎的文章居然是大台北行政區圖,真是叫身為 RD 的我情何以堪。

為了不辜負這篇文章的高人氣,還是寫個 note 教大家如何自行 DIY。

01. 下載 QGIS,32 or 64 位元的都可以。
http://www.qgis.org/en/site/forusers/download.html#

02. 下載鄉鎮市區界線,選擇 SHP 格式,並解壓縮到資料夾,裡面的 zip 還要再解壓縮 1次。
https://data.gov.tw/dataset/7441

03. 開啟 QGIS Desktop 2.18.12。

04. 選單 -> Layer -> Add Layer -> Add Vector Layer。

05. Source Type -> File, Encoding -> UTF8, Dataset -> TOWN_MOI_1060525.shp

06. 因為我們要針對台北市和新北市上不同的顏色,故步驟 5 需要做 2次,此時左邊的 Layers Panel 會有 2 個載入的圖層。

07. 任意選取一個圖層按滑鼠右鍵,選擇 "Filter",在 Provider specific filter expression 中輸入 "COUNTYID" = 'A' (只顯示台北市)。

08. 在另一個圖層依樣畫葫蘆,但條件改成 "COUNTYID" = 'F' (只顯示新北市)。

09. 接著選取任意圖層按滑鼠右鍵,進入 "Properties",在 Labels 頁面選擇 "Show labels for this layer","Label with" "TOWNNAME",並可針對 "text" or "Background" 做調整。

10. 使用工具列放大縮小工具,調成適當的大小,並用掌型工具將圖層移動到正中央。

11. 選單 -> Project -> Save as Image。

12. 如果想要做別的縣市,在未 Filter 的圖層上按滑鼠右鍵,選擇 "Open Attrubute Table",就可以找尋想要縣市的相關資料來做 Filter,建議使用 COUNTRYID,可以少打幾個字,如果不好找到目標,可以在表格上方任一欄位按一下,就可以針對該欄位資料排序,好加速搜尋。

UEFI Application - Python HTTPServer

今天繼續來嘗試 HTTPServer module
但是要記得在 AppPkg\Applications\Python\Efi\config.c 打開 "select" module

實際在執行時,會發生 threading module error
手動 copy PC 版的 threading.py and _threading_local.py 到 EFI\StdLib\lib\python.27

到目前為止,終於可以順利的執行測試程式 
如果執行目錄下沒有 index.html
開啟瀏覽器便會看到執行目錄的檔案列表

不過在點選下載時會發生 content_length 的錯誤
有空再來看看發生什麼事了

test code
import sys
import BaseHTTPServer
from SimpleHTTPServer import SimpleHTTPRequestHandler

HandlerClass = SimpleHTTPRequestHandler
ServerClass = BaseHTTPServer.HTTPServer
Protocol = "HTTP/1.0"

server_address = ('192.168.0.163', 8080)

HandlerClass.protocol_version = Protocol
httpd = ServerClass(server_address, HandlerClass)

print 'Starting httpd...'
httpd.serve_forever()

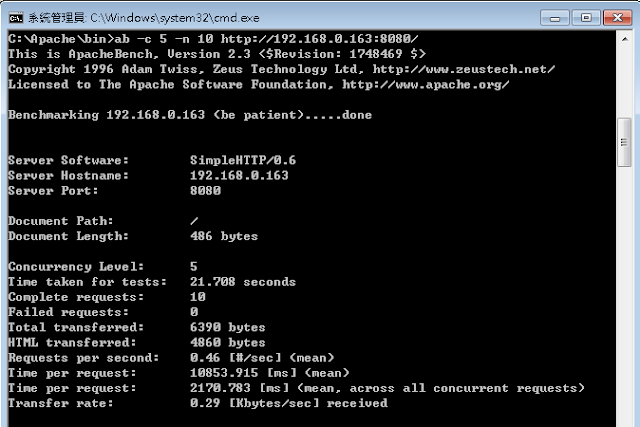
受限於 UEFI 單工的執行方式
HTTPServer 的效能並不太好
底下是用 ab 測試的數據,提供參考


2017年9月7日 星期四

UEFI Application - Python httplib

原本以為 UEFI 裡的 Python 沒有包含 httplib
無聊鑽進 Lib 資料夾後,居然發現有 "httplib.py"
當然二話不說的跑去 UEFI Shell 下試用

一開始出現了 array 模組不存在的錯誤
在陸續打開了 "_md5", "_sha", "_sha256", "_sha512" 模組後
("socket" 之前就打開了)
終於順利的執行測試程式

另外,如果網址不是 IP 形式
記得設定 EFI\Stdlib\etc\resolv.conf
隨便加入 1 個 DNS Server
我這裡是使用 google DNS Server "8.8.8.8"

底下是測試程式的範例
import httplib

conn = httplib.HTTPConnection("www.example.com")

conn.request("GET", "/")

res = conn.getresponse()

print res.status, res.reason

data = res.read()

print data

conn.close()


有圖有真相

2017年9月6日 星期三

Javascript 正規表示法

https://developer.mozilla.org/en-US/docs/Web/JavaScript/Reference/Global_Objects/RegExp

純 Javascript 中使用正規表示法

regex 是一個正規表示
str 是一個字串
info 是執行 exec 回傳的 array

因為我們有用 "( )" 圈住數字
故 array[1] 會是 123
而 array[2] 會是 456


程式範例
var regex = /(\d+) (\d+)/;
var str = '123 456';
var info = regex.exec(str);

for (var i = 0; i < info.length; i++) {
    console.log(i, info[i]);
}

執行結果
0 '123 456'
1 '123'
2 '456'

如果字串中有 1 個以上要匹配的地方,我們可以考慮使用 flag 'g'
如果忘記加上 'g',程式便會進入無窮迴圈,因為 regex.lastIndex always = 0
var regex = /(\d+) (\d+)/g;
var str = '123 456; 789 100';

var info;
while ((info = regex.exec(str)) != null) {
    console.log(regex.lastIndex);
    for (var i = 0; i < info.length; i++) {
        console.log(i, info[i]);
    }
}

執行結果
7
0 '123 456'
1 '123'
2 '456'
16
0 '789 100'
1 '789'
2 '100'

UEFI Application - Python socket

在 build Python 時,預設不 support socket module
我們可以在 AppPkg\Applications\Python\Efi\config.c 打開要支援的 module
在這裡我打開了 socket and datetime

不過實際在寫 code 時
遇到 connect 會發生問題
這個問題不只 Python 會發生
應該是說原生的 socket library 就有問題

其實也不能說是問題,而是 UEFI implement socket 的方式
只要對 AppPkg\Applications\Python\Python-2.7.2\Modules\socketmodule.c 做些手腳即可
(提示:修改 socket_connect 這支 function,對判斷 res 回傳值動手腳)

有圖有真相
此範例是在 VMware 下執行
至於要如何在 VMware 下執行 UEFI Shell,那又是另外一個故事了
請參考 https://blog.fpmurphy.com/2014/07/using-vmware-workstation-to-experiment-with-uefi.html


import socket
import sys
import time
import datetime

sock = socket.socket(socket.AF_INET, socket.SOCK_STREAM, socket.IPPROTO_TCP)

server_address = ('192.168.111.1', 8080)

print >>sys.stderr, 'connecting to %s port %s' % server_address
sock.connect(server_address)

try:
    message = "This is the message"
    for x in range(0, 10):
        msg = '%s %02d (%s)' % (str(datetime.datetime.now()), x+1, message)
        print(msg)
        sock.sendall(message)
        time.sleep(2)        
    
finally:
    print("close socket")
    sock.close()

2017年9月5日 星期二

UEFI Application - Python 2.7.2

TianoCore 已經在 AppPkg 下放置了 Python 2.7.2 的 code。

底下是在 UEFI 下執行 Python 的步驟,這裡我使用的是 UDK2014VS2013

1. build 出 Python.efi 的執行檔,過程中共會遇到 2 種錯誤。
    a. file encoding issue - "Python\PyMod-2.7.2\Python\marshal.c" 只要將這支檔案轉成 Unicode 即可。
    b. variables aren't initialized issue - 問題都是出在 structure pointer variable,just assign NULL to it。
2. copy  AppPkg\Applications\Python\PyMod-2.7.2\Lib\*.py 到  AppPkg\Applications\Python\Python-2.7.2\Lib。
3. 參考 AppPkg\Applications\Python\PythonReadMe.txt 步驟 4,將相關檔案置於對應的目錄。
4. 執行 Python.efi,如果要回到 UEFI Shell,執行 exit(),便會離開 Python 命令列模式。

2018/5/24 更新
後來 TianoCore 有 2 個 commit 分別解決了 step1 的 issue,有興趣的可以看看

de08c53b0f65f212c25f0eea13d6cdf4bd9c7fb4
1ea946d0f9ea7de963545fbe93cc7f781c03d0b2

 有圖有真相。