pretty code

2017年12月27日 星期三

Golang LeetCode

太久沒解就會忘記設定專案細節

1. 使用 Golang
2. foder name and package is 題號
3. In GOPATH, type "go test LeetCode/LeetCode_00728"
4. Benchmark, type "go test LeetCode/LeetCode_00278 -bench=."
src 
    - LeetCode
               - LeetCode_00728
                                - LeetCode_00728.go
                                - LeetCode_00728_test.go    

2017年12月11日 星期一

Windows 工作排程器 command-line

雖然我們可以用 GUI 界面去設定工作排程
但這樣的方式不太容易自動化

幸好,Windows  有一個指令 schtasks
我們可以利用它來自動化建立排程

Examples:
    SCHTASKS
    SCHTASKS /?
    SCHTASKS /Run /?
    SCHTASKS /End /?
    SCHTASKS /Create /?
    SCHTASKS /Delete /?
    SCHTASKS /Query  /?
    SCHTASKS /Change /?
    SCHTASKS /ShowSid /?


不過如果要執行的是批次檔,常會遇到工作路徑不對的問題
這時候我們有 2 種解決方式

1. 照 help 說明,傳參數進去,可惜我不管如何排列組合,總是不成功

    ==> 檔案路徑中的空白可使用兩組引號,一組
        用於 CMD.EXE,另一組用於 SchTasks.exe。用於 CMD 的外部引號
        必須是雙引號; 內部引號則可以是單引號或
        逸出雙引號:
        SCHTASKS /Create
           /tr "'c:\program files\internet explorer\iexplorer.exe'
           \"c:\log data\today.xml\"" ...


2. 利用內建變數,切換磁碟機與資料夾路徑

@echo off

%~d0
cd %~dp0


搞定收工,方法 1 有空再來看怎麼回事?

2017年11月7日 星期二

x86 Assembly Intel to AT&T

最近工作需要使用人家寫好的組語去控制 HW
我需要的是 AT&T 語法
不過因為對方不熟 AT&T 語法
故需轉換對方寫的 Intel 語法

本想直接人工轉換,但又怕不懂組語的我做白工
上網搜尋了一下,找到一個專案 ta2as
試了一下,只要調整來源檔輸出,就能順利的轉出 AT&T 語法
除了 mox 指令 找不到改用 movb 以外(有誰可以告訴我有 mox 指令 嗎?)
使用起來感覺沒什麼問題

另外,有參考 purpose 網友的 PTT 文章 ,好確認 ta2as 工具是否有轉錯

題外話,很久以前就想學組語,不過一直抽不出時間
brianhsu 網友有另外一篇 PTT 文章,推薦學組語的參考書籍
記錄一下當作備忘

2017年11月1日 星期三

UEFI Shell script format

UEFI Shell script 的寫法跟 Windows Batch 差不多
其副檔名為 "nsh"

文字檔編碼可以使用 UCS-2 or ASCII

不過因為 UEFI Shell 預設編碼為 UCS-2
如果將 Shell Command 導向到 UEFI C Application 產生的 ASCII Log 時,就會產生 error

此時只要簡單將 ">" 改成 ">a" 即可
a 就是 ASCII 的意思

2017年10月26日 星期四

UEFI Shell

最近需要 pass Shell Env to my shell script
原本以為是很難的事
幸好 UEFI 在 C Lib 中就提供了 setenv 函數

不過事情不是憨人想的那樣
呼叫此 function 會失敗
從 errno 中看到失敗值是 45 表示 unsupport

沒關係除了 setenv,我們還有二個方式
1. UefiShellLib 的 ShellSetEnvironmentVariable(後來才發現 setenv 也是 call 它)
2. 使用 SHELL PROTOCOL

很不幸的 2 個方式都會 gg,回傳的值是 3  (EFI_UNSUPPORTED)
此時直覺是 INF 設定有問題,調整老半天還是搞不定

後來換了 UEFI Shell 後,事情總算解決了
不過此時又跑出一個新的 question

EdkShellBinPkg 還有 ShellBinPkg 裡面都有 Shell Binary
為什麼一個可以成功,一個卻不行
過了一個禮拜終於在 官網 github 找到答案

簡單來說 EdkShellBinPkg 是 v1.0 的 Shell Spec
ShellBinPkg 是 v2.0 的 Shell Spec
我們從下圖的註解便可以得知
需要 UEFI Shell 2.0 的環境才能支援


/**
  set the value of an environment variable

This function changes the current value of the specified environment variable. If the
environment variable exists and the Value is an empty string, then the environment
variable is deleted. If the environment variable exists and the Value is not an empty
string, then the value of the environment variable is changed. If the environment
variable does not exist and the Value is an empty string, there is no action. If the
environment variable does not exist and the Value is a non-empty string, then the
environment variable is created and assigned the specified value.

  This is not supported pre-UEFI Shell 2.0.

  @param EnvKey                 The key name of the environment variable.
  @param EnvVal                 The Value of the environment variable
  @param Volatile               Indicates whether the variable is non-volatile (FALSE) or volatile (TRUE).

  @retval EFI_SUCCESS           the operation was completed sucessfully
  @retval EFI_UNSUPPORTED       This operation is not allowed in pre UEFI 2.0 Shell environments
**/
EFI_STATUS
EFIAPI
ShellSetEnvironmentVariable (
  IN CONST CHAR16               *EnvKey,
  IN CONST CHAR16               *EnvVal,
  IN BOOLEAN                    Volatile
  )
{
  //
  // Check for UEFI Shell 2.0 protocols
  //
  if (gEfiShellProtocol != NULL) {
    return (gEfiShellProtocol->SetEnv(EnvKey, EnvVal, Volatile));
  }

底下分別是 EdkShellBinPkg 和 ShellBinPkg 的 Shell version information


2017年10月16日 星期一

get callback's return value inside synchronous function

最近在幫別人改 Node.js 的 code
由於他的寫法是同步,但是又使用 callback 方式

原本以為在改架構時,可以簡單的改成 return 形式
但卻撞到不知名的 bug
試了一下才知道在 callback 中的 reurn 不等於呼叫 callback 的 function 的 return
如果直接 return,此時的 var a 會是 undefined

抱歉,不熟 Node.js 不知要怎麼形容
記錄一下,以後再來找答案


function test(callback) {
    console.log("in test");

    var usage = Math.floor((Math.random() * 100) + 1);

    if ((usage%2) == 0) {
        callback(true);
    } else {
        callback(false);
    }

    console.log("exit test");
}

function b() {
    console.log("in b");

    var res;
    test(function(result) {
        console.log("in test callback", result);
        /*
        if (result) {
            return true;
        } else {
            return false;
        }
        */
        res = result;
    });

    console.log("after test");
    return res;
}

var a = b();

console.log("after b");
console.log(a);

2017年10月2日 星期一

Golang - cross complie

原本測試 Linux 的電腦最近都用來跑 UEFI
由於不需要鍵盤,故臨時要用 Linux 很不方便
再加上該 Linux 並沒有安裝 Golang,故也沒有相關的設定

幸好,Golang 支援 cross complie
在我工作的 Windows 電腦上
只要簡單設定幾個環境變數
就可以順利的 build 出跨平台 binary

set GOOS=linux
set GOARCH=amd64
go build

2017年9月29日 星期五

UEFI Application - load protocol

今天需要在 app 中讀取 CMOS 資訊
經同事建議後,使用 EFI_CPU_IO_PROTOCOL 來讀取它

由於完全不懂 BIOS 概念
網路上也找不到相關資料
在翻遍了 UDK2014 code base 後
搞了 2 個小時才搞定

希望寫出來的東西不會誤導大眾

xxx.inf

[Protocols]
    gEfiCpuIoProtocolGuid

xxx.c

#include <Protocol/CpuIo.h>
#include <Library/UefiBootServicesTableLib.h>
#include <stdio.h>

EFI_CPU_IO_PROTOCOL *mCpuIo = NULL;

void testReadCMOS()
{
    EFI_STATUS Status;
    UINT8 addr;
    UINT8 data;
    
    Status = gBS->LocateProtocol(&gEfiCpuIoProtocolGuid, NULL, (VOID **)&mCpuIo);  
    if (Status != EFI_SUCCESS) {
        return;
    }
    
    addr = 0x30;
    Status = mCpuIo->Io.Write(
        mCpuIo,
        EfiCpuIoWidthUint8,
        0x70,
        1,
        &addr
    );
    
    if (Status != EFI_SUCCESS) {
        return;
    }
    
    Status = mCpuIo->Io.Read(
        mCpuIo,
        EfiCpuIoWidthUint8,
        0x71,
        1,
        &data
    );
    
    if (Status != EFI_SUCCESS) {
        return;
    }
    
    printf("CMOS 0x30=%X", data); 
}

2017年9月18日 星期一

Golang sync.WaitGroup 備忘

有時候身上有太多專案不是一件好事
特別是當每個專案用的語言都不一樣時

最近在忙一個專案
使用的語言是 C
故這一陣子比較少用 Golang

等到這個專案要開始寫模擬程式時
又要切回 Golang
一時之間還真的轉不過來

就拿 sync.WaitGroup 來說
這是用來控制 goruntime 正常結束的 struct

不過常常隔一陣子寫 Golang
就會把它當成特殊 type 變數
故會忘記傳指標進去 goruntime
導致程式無法正常結束

於是決定來 trace 一下 source code
好加深印象,以後就不會忘記了

我們先來看 Go/src/sync/waitgroup.go
很明顯的是一個 struct 無誤
 
// A WaitGroup waits for a collection of goroutines to finish.
// The main goroutine calls Add to set the number of
// goroutines to wait for. Then each of the goroutines
// runs and calls Done when finished. At the same time,
// Wait can be used to block until all goroutines have finished.
//
// A WaitGroup must not be copied after first use.
type WaitGroup struct {
 noCopy noCopy

 // 64-bit value: high 32 bits are counter, low 32 bits are waiter count.
 // 64-bit atomic operations require 64-bit alignment, but 32-bit
 // compilers do not ensure it. So we allocate 12 bytes and then use
 // the aligned 8 bytes in them as state.
 state1 [12]byte
 sema   uint32
}

接著再來看它提供的 method Add( )
其宣告形式也是一個指標
 
func (wg *WaitGroup) Add(delta int) {
 statep := wg.state()
 if race.Enabled {
  _ = *statep // trigger nil deref early
  if delta < 0 {
   // Synchronize decrements with Wait.
   race.ReleaseMerge(unsafe.Pointer(wg))
  }
  race.Disable()
  defer race.Enable()
 }
        ...
}

希望以後就不會忘記了

2017年9月12日 星期二

happy-go-lucky 計算下班時間

以後不知道要寫什麼文章
就來寫些小程式誕生的故事

今天第一個故事就是計算下班時間的小工具

雖然說身為 RD 的我們不太可能準時下班
但偶爾也會有早來想要早點下班運動的時候

很不巧的我們的刷卡記錄要明天才能查詢
雖然我們可以偶爾不做滿 8個小時
但奉公守法的我還是覺得很不習慣

於是就想要知道大概的上班時間
這樣才能確定要幾點才能下班

後來靈機一動
想要利用電腦開機的時間來當做刷卡時間
理論上刷卡時間一定會在電腦開機之前
故以這個時間當基準一定不會有錯

註:不管是什麼機器,時間都需要校時
以我以前 MIS 的經驗,刷卡機會跟資料庫主機對時
而資料庫主機又會跟 AD Server 對時
AD Server 又會跟外部服務對時
這樣才能確保大家的時間都一致

以 Windows來說
我們可以去 事件檢視器 -> Windows 記錄 -> 系統
尋找一個事件檢視碼為 12 的事件
裡面就會有我們開機的時間

這時候利用 Google 我們查到了 "wevtutil" 這個指令
它可以用來查詢相關的事件並指定 Filter 條件(時間)
由於這個指令會把所有事件都查詢出來
故我們再加上 Find 這個指令
只挑選出 EventID 12 的行數
wevtutil qe system  "/q:*[System[TimeCreated[@SystemTime>='2017-09-10T00:00:00']]]" | 
find /N "12</EventID>"

另外一種解法
EventID 12 有一個特殊欄位
只有 EventID 12 才有
wevtutil qe system /q:Event[EventData[Data[@Name='StartTime']>'2017-09-10T00:00:00']]

出來的結果如下
<Event xmlns='http://schemas.microsoft.com/win/2004/08/events/event'>
<System>
<Provider Name='Microsoft-Windows-Kernel-General' Guid='{A68CA8B7-004F-D7B6-A698-07E2DE0F1F5D}'/>
<EventID>12</EventID>
<Version>0</Version>
<Level>4</Level>
<Task>0</Task>
<Opcode>0</Opcode>
<Keywords>0x8000000000000000</Keywords>
<TimeCreated SystemTime='2017-09-12T01:30:41.749600400Z'/>
<EventRecordID>302816</EventRecordID>
<Correlation/>
<Execution ProcessID='4' ThreadID='8'/>
<Channel>System</Channel>
<Computer> xxxxx </Computer>
<Security UserID='S-1-5-18'/>
</System>
<EventData>
<Data Name='MajorVersion'>6</Data>
<Data Name='MinorVersion'>1</Data>
<Data Name='BuildVersion'>7601</Data>
<Data Name='QfeVersion'>23807</Data>
<Data Name='ServiceVersion'>1</Data>
<Data Name='BootMode'>0</Data>
<Data Name='StartTime'>2017-09-12T01:30:41.125599300Z</Data>
</EventData>
</Event>

好了,食材都有了,就讓我們開始下廚吧

我們利用 Golang os/exec, time, strings 等 package
就可以簡單炒出一盤好菜了

package main

import (
    "fmt"
    "log"
    "os/exec"
    "strings"
    "time"
)

const workTime = 8 * 60 + 75

func getCMDResult(today string) (string, error) {
    subcmd := fmt.Sprintf("wevtutil qe system /q:Event[EventData[Data[@Name='StartTime']^>'%s']]", today)
    cmd := exec.Command("cmd", "/C", subcmd)

    out, err := cmd.Output()
    if err != nil {
        return "", err
    }

    return string(out), nil
}

func getStartTime(log string) string {
    pattern := "'StartTime'>"

    i := strings.Index(log, pattern)
    if i >= 0 {
        start := i + len(pattern)
        out := log[start:start+30]
        return out
    }

    return ""
}

func getHumanTime(t time.Time) string {
    return fmt.Sprintf(
        "%04d-%02d-%02d %02d:%02d",
        t.Year(),
        t.Month(),
        t.Day(),
        t.Hour(),
        t.Minute(),
    )
}

func printWorkTime(startTime string) {
    t1, err := time.Parse(time.RFC3339, startTime)
    if err != nil {
        fmt.Println(err)
        return
    }

    fmt.Println("")
    fmt.Printf("clock in  : %s \n", getHumanTime(t1.Local()))
    fmt.Printf("clock out : %s \n", getHumanTime(t1.Add(time.Duration(workTime)*time.Minute).Local()))
}

func main() {
    t1 := time.Now()
    t2 := time.Date(t1.Year(), t1.Month(), t1.Day(), 0, 0, 0, 0, time.FixedZone("UTC", 0))

    out, err := getCMDResult(t2.Format(time.RFC3339))
    if err != nil {
        log.Fatal(err)
    }

    startTime := getStartTime(out)

    if startTime != "" {
        printWorkTime(startTime)
        return
    }

    fmt.Println("Can't get start time in Windows event log")
}


https://github.com/tylpk1216/go-clockout

2017年9月8日 星期五

大台北行政區圖 DIY

身為一個專業的 RD,最受歡迎的文章居然是大台北行政區圖,真是叫身為 RD 的我情何以堪。

為了不辜負這篇文章的高人氣,還是寫個 note 教大家如何自行 DIY。

01. 下載 QGIS,32 or 64 位元的都可以。
http://www.qgis.org/en/site/forusers/download.html#

02. 下載鄉鎮市區界線,選擇 SHP 格式,並解壓縮到資料夾,裡面的 zip 還要再解壓縮 1次。
https://data.gov.tw/dataset/7441

03. 開啟 QGIS Desktop 2.18.12。

04. 選單 -> Layer -> Add Layer -> Add Vector Layer。

05. Source Type -> File, Encoding -> UTF8, Dataset -> TOWN_MOI_1060525.shp

06. 因為我們要針對台北市和新北市上不同的顏色,故步驟 5 需要做 2次,此時左邊的 Layers Panel 會有 2 個載入的圖層。

07. 任意選取一個圖層按滑鼠右鍵,選擇 "Filter",在 Provider specific filter expression 中輸入 "COUNTYID" = 'A' (只顯示台北市)。

08. 在另一個圖層依樣畫葫蘆,但條件改成 "COUNTYID" = 'F' (只顯示新北市)。

09. 接著選取任意圖層按滑鼠右鍵,進入 "Properties",在 Labels 頁面選擇 "Show labels for this layer","Label with" "TOWNNAME",並可針對 "text" or "Background" 做調整。

10. 使用工具列放大縮小工具,調成適當的大小,並用掌型工具將圖層移動到正中央。

11. 選單 -> Project -> Save as Image。

12. 如果想要做別的縣市,在未 Filter 的圖層上按滑鼠右鍵,選擇 "Open Attrubute Table",就可以找尋想要縣市的相關資料來做 Filter,建議使用 COUNTRYID,可以少打幾個字,如果不好找到目標,可以在表格上方任一欄位按一下,就可以針對該欄位資料排序,好加速搜尋。

UEFI Application - Python HTTPServer

今天繼續來嘗試 HTTPServer module
但是要記得在 AppPkg\Applications\Python\Efi\config.c 打開 "select" module

實際在執行時,會發生 threading module error
手動 copy PC 版的 threading.py and _threading_local.py 到 EFI\StdLib\lib\python.27

到目前為止,終於可以順利的執行測試程式 
如果執行目錄下沒有 index.html
開啟瀏覽器便會看到執行目錄的檔案列表

不過在點選下載時會發生 content_length 的錯誤
有空再來看看發生什麼事了

test code
import sys
import BaseHTTPServer
from SimpleHTTPServer import SimpleHTTPRequestHandler

HandlerClass = SimpleHTTPRequestHandler
ServerClass = BaseHTTPServer.HTTPServer
Protocol = "HTTP/1.0"

server_address = ('192.168.0.163', 8080)

HandlerClass.protocol_version = Protocol
httpd = ServerClass(server_address, HandlerClass)

print 'Starting httpd...'
httpd.serve_forever()

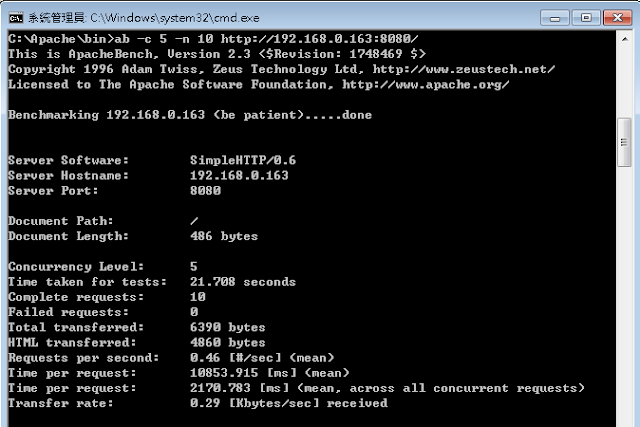
受限於 UEFI 單工的執行方式
HTTPServer 的效能並不太好
底下是用 ab 測試的數據,提供參考


2017年9月7日 星期四

UEFI Application - Python httplib

原本以為 UEFI 裡的 Python 沒有包含 httplib
無聊鑽進 Lib 資料夾後,居然發現有 "httplib.py"
當然二話不說的跑去 UEFI Shell 下試用

一開始出現了 array 模組不存在的錯誤
在陸續打開了 "_md5", "_sha", "_sha256", "_sha512" 模組後
("socket" 之前就打開了)
終於順利的執行測試程式

另外,如果網址不是 IP 形式
記得設定 EFI\Stdlib\etc\resolv.conf
隨便加入 1 個 DNS Server
我這裡是使用 google DNS Server "8.8.8.8"

底下是測試程式的範例
import httplib

conn = httplib.HTTPConnection("www.example.com")

conn.request("GET", "/")

res = conn.getresponse()

print res.status, res.reason

data = res.read()

print data

conn.close()


有圖有真相

2017年9月6日 星期三

Javascript 正規表示法

https://developer.mozilla.org/en-US/docs/Web/JavaScript/Reference/Global_Objects/RegExp

純 Javascript 中使用正規表示法

regex 是一個正規表示
str 是一個字串
info 是執行 exec 回傳的 array

因為我們有用 "( )" 圈住數字
故 array[1] 會是 123
而 array[2] 會是 456


程式範例
var regex = /(\d+) (\d+)/;
var str = '123 456';
var info = regex.exec(str);

for (var i = 0; i < info.length; i++) {
    console.log(i, info[i]);
}

執行結果
0 '123 456'
1 '123'
2 '456'

如果字串中有 1 個以上要匹配的地方,我們可以考慮使用 flag 'g'
如果忘記加上 'g',程式便會進入無窮迴圈,因為 regex.lastIndex always = 0
var regex = /(\d+) (\d+)/g;
var str = '123 456; 789 100';

var info;
while ((info = regex.exec(str)) != null) {
    console.log(regex.lastIndex);
    for (var i = 0; i < info.length; i++) {
        console.log(i, info[i]);
    }
}

執行結果
7
0 '123 456'
1 '123'
2 '456'
16
0 '789 100'
1 '789'
2 '100'

UEFI Application - Python socket

在 build Python 時,預設不 support socket module
我們可以在 AppPkg\Applications\Python\Efi\config.c 打開要支援的 module
在這裡我打開了 socket and datetime

不過實際在寫 code 時
遇到 connect 會發生問題
這個問題不只 Python 會發生
應該是說原生的 socket library 就有問題

其實也不能說是問題,而是 UEFI implement socket 的方式
只要對 AppPkg\Applications\Python\Python-2.7.2\Modules\socketmodule.c 做些手腳即可
(提示:修改 socket_connect 這支 function,對判斷 res 回傳值動手腳)

有圖有真相
此範例是在 VMware 下執行
至於要如何在 VMware 下執行 UEFI Shell,那又是另外一個故事了
請參考 https://blog.fpmurphy.com/2014/07/using-vmware-workstation-to-experiment-with-uefi.html


import socket
import sys
import time
import datetime

sock = socket.socket(socket.AF_INET, socket.SOCK_STREAM, socket.IPPROTO_TCP)

server_address = ('192.168.111.1', 8080)

print >>sys.stderr, 'connecting to %s port %s' % server_address
sock.connect(server_address)

try:
    message = "This is the message"
    for x in range(0, 10):
        msg = '%s %02d (%s)' % (str(datetime.datetime.now()), x+1, message)
        print(msg)
        sock.sendall(message)
        time.sleep(2)        
    
finally:
    print("close socket")
    sock.close()

2017年9月5日 星期二

UEFI Application - Python 2.7.2

TianoCore 已經在 AppPkg 下放置了 Python 2.7.2 的 code。

底下是在 UEFI 下執行 Python 的步驟,這裡我使用的是 UDK2014VS2013

1. build 出 Python.efi 的執行檔,過程中共會遇到 2 種錯誤。
    a. file encoding issue - "Python\PyMod-2.7.2\Python\marshal.c" 只要將這支檔案轉成 Unicode 即可。
    b. variables aren't initialized issue - 問題都是出在 structure pointer variable,just assign NULL to it。
2. copy  AppPkg\Applications\Python\PyMod-2.7.2\Lib\*.py 到  AppPkg\Applications\Python\Python-2.7.2\Lib。
3. 參考 AppPkg\Applications\Python\PythonReadMe.txt 步驟 4,將相關檔案置於對應的目錄。
4. 執行 Python.efi,如果要回到 UEFI Shell,執行 exit(),便會離開 Python 命令列模式。

2018/5/24 更新
後來 TianoCore 有 2 個 commit 分別解決了 step1 的 issue,有興趣的可以看看

de08c53b0f65f212c25f0eea13d6cdf4bd9c7fb4
1ea946d0f9ea7de963545fbe93cc7f781c03d0b2

 有圖有真相。

2017年8月31日 星期四

UEFI Application - Event

基本上 UEFI 是個單工的系統,它並不支持中斷
而是透過 Event﹝Timer interrupt﹞來達成任務的分配

底下是一個簡單 create Event 的例子
這個 Event 綁定在 1 個 5 秒鐘會觸發 1 次的 Timer 上
不多說,直接來看範例

#include <Library/UefiBootServicesTableLib.h>
#include <stdio.h>
#include <time.h>
//-----------------------------------------------------------------------------
static int g_count = 1;
//-----------------------------------------------------------------------------
void printTime(void)
{
    struct tm *t1;
    time_t ret;

    time(&ret);
    ret += 8 * 60 * 60;
    t1 = gmtime(&ret);

    printf(
        "[%04d-%02d-%02d %02d:%02d:%02d] %02d - in NotifyFunction \n",
        t1->tm_year + 1900,
        t1->tm_mon + 1,
        t1->tm_mday,
        t1->tm_hour,
        t1->tm_min,
        t1->tm_sec,
        g_count
    );
}
//-----------------------------------------------------------------------------
VOID EFIAPI 
NotifyFunction(
  IN  EFI_EVENT  Event,
  IN  VOID       *Context
  )
{
    printTime();

    g_count++;
}
//-----------------------------------------------------------------------------
int main(int argc, char **argv)
{
    EFI_EVENT event;

    gBS->CreateEvent(
        EVT_TIMER | EVT_NOTIFY_SIGNAL,
        TPL_NOTIFY,
        NotifyFunction,
        NULL,
        &event
    );

    // every 5 seconds to trigger
    gBS->SetTimer(event, TimerPeriodic, 50000000);

    do {
        // wait NotifyFunction
    } while(g_count < 10);

    gBS->SetTimer(event, TimerCancel, 0);

    gBS->CloseEvent(event);

    return 0;
}

2017年8月30日 星期三

UEFI Application - network support

UEFI 下,想要撰寫 TCP / IP 的程式,說難不是太難,說簡單也不是很簡單。

簡單來說,如果很久以前曾在 Linux or Unix 下寫過 socket 程式,那我想這就不是一件很難的事,只要注意一些 header 檔案的位置跟傳統的不一樣即可。


從上圖可以得知,要在 UEFI Shell 下使用網路,需具備 4 要件:
1. 要有網卡。
2. 要有 UNDI driver。
3. 載入 Simple Network Protocol。
4. 載入 TCP / IP Stack。

註:從 Intel 的文件 "UEFI Driver Development Guide for Network Boot Devices" 來看,SNPTCP / IP Stack 中間似乎還有一層 MNP ( Managed Network Protocol ),不過這邊我們可以先忽略它。

以我的小電腦來說,除了 Simple Network Protocol 以外,其餘皆已內建,故我從 UDK2014 code base 中 build 出此 driver 即可﹝C:\edk2-UDK2014\MdeModulePkg\Universal\Network﹞,接著開機時,使用 "load" command 載入 driver,便可以順利使用 "ifconfig" command 取得 IP。

再來就是跟以前撰寫 socket 程式一樣,呼叫 socket, connect, send, close 等函式完成想要完成的工作,底下為 Client 端發送封包的例子。


#include <netinet/in.h>
#include <sys/EfiSysCall.h>
#include <sys/socket.h>
#include <arpa/inet.h>

int testTCPSocket(char *serverIP, int serverPort)
{
    int rc;
    int sock;
    struct sockaddr_in v4;

    char data[1024];
    size_t sentBytes;
    size_t sendStrLen;

    sock = socket(AF_INET, SOCK_STREAM, IPPROTO_TCP);
    if (sock == -1)
    {
        printf("init socket error\n");
        return -1;
    }

    memset(&v4, 0x00, sizeof(v4));

    v4.sin_len = sizeof(v4);
    v4.sin_family = AF_INET;
    v4.sin_addr.s_addr = inet_addr(serverIP);
    v4.sin_port = htons(serverPort);

    rc = connect(sock, (struct sockaddr*)&v4, sizeof(v4));
    if (rc == -1)
    {
        printf("connect() failed (%d)\n", rc);
        //return -1;
    }

    printf("input string to send or 'q' to exit connection\n");

    while (1)
    {
        memset(data, 0x00, sizeof(data));

        fgets(data, sizeof(data) - 1, stdin);
        if (data[0] == 'q')
        {
            printf("ready to exit connection\n");
            break;
        }

        sendStrLen = strlen(data);

        if (sendStrLen > 0 && sendStrLen < 1023)
        {
            sentBytes = send(sock, data, sendStrLen, 0);
            printf("\t !!! Sent data: %s(%d) --- \n", data, sentBytes);
        }
    }

    close(sock);

    return 0;
}

2017年8月24日 星期四

UEFI Application - trigger watchdog timer

不多說,直接看程式

xx.inf

[LibraryClasses]
    UefiLib


xx.c

#include <library/efibootservicestablelib.h>

void triggerWatchdog(int sec)
{
    gBS->SetWatchdogTimer(sec, 0x0000, 0x00, NULL);
}

int main(void)
{
    triggerWatchdog(10);
    
    while (1) ;
    
    return 0;
}

UEFI Application - reboot system

想要在 UEFI Application 重開機
其實是一件很簡單的事
只要呼叫 RuntimeServices 去 reset 即可

UEFI 總共支援 3種的 reset ( HW / BIOS 也需支援 )
1. Cold Reset
2. Warm Reset ( 有部份的 RAM 並未清空 )
3. SHUTDOWN


相關程式如下

 xx.inf
[LibraryClasses]
    UefiLib


xx.c

#include <library/efibootservicestablelib.h>
int main(void)
{
    gRT->ResetSystem(EfiResetCold, EFI_SUCCESS, 0, NULL);    
    return 0;
}

2017年8月23日 星期三

UEFI Application 小小心得

如果有人像我這麼苦命,不是做 BIOS 卻要在 UEFI Shell 開發 Application,強烈建議都用 C 形式去寫,也就是 int main(void),這樣的好處是有些 open source 的 C library 比較容易 porting 到 UEFI 下使用。

相反的,當你寫好的 code,如果反過來想要 porting 回 Windows or Linux 下,也是非常容易。

只要你在寫的時候,把 define 定義好,以總行數約 1500 的 code 來說,可能只要增加幾個 define 就可以讓同樣的 code 在 UEFI 和其他 OS 都通吃,花費的時間可能也不會超過 20 分鐘,甚至 Windows 和 UEFI 用不同的 compiler 也是無痛接軌。

不過今天早上第一次嘗試的時候,還是撞了一下牆,但是搞定後,心情只有一個字 "爽" 可以形容,連日來的不快也隨著 "爽" 而煙消雲散了。

define 示意圖

void mySleep(int retrySleepSecs)
{
#ifdef WINDOWS_PC
        Sleep(retrySleepSecs * 1000);
#else
        sleep(retrySleepSecs);
#endif // WINDOWS_PC
}

2017年8月8日 星期二

Linux strace command

之前在 tune Web Server performance 時,有從書中學到這個 command,此 command 可用來觀看 Web Server 目前瓶頸可能的原因。

底下是關於此 command 的相關文章,非常值得一讀。

https://blogs.oracle.com/ksplice/strace-the-sysadmins-microscope?utm_campaign=CodeTengu&utm_medium=email&utm_source=CodeTengu_99

2017年6月27日 星期二

討厭的 DOS 程式


1. Enter Linux
2. make all
3. ./makedos.sh
4. make dos
5. copy exe to bootable disk

2017年6月9日 星期五

DOS network

https://www.lazybrowndog.net/freedos/virtualbox/

上面是教導如何在 DOS 使用網路並存取網路磁碟機的方法
經實測 DOS <-> Windows 7 確定是可以互通的

另外如果是想自己寫程式發送 TCP or UDP 封包
可以考慮  http://www.brutman.com/mTCP/ 提供的 mTCP-src_2013-05-23.zip
並參考 \APPS\HTGET 這支範例

編譯方式也很簡單
1. 開啟 Open Watcom Build Environment cmd windows
2. cd \APPS\HTGET
3. wmake -f MAKEFILE

據實測結果,在另一台電腦用 Go 寫的 TCPServer 確定可以收到封包
不過常常送了幾次後,DOS 端的 socket 就會關閉
目前還沒有時間研究這個,等以後再來查看


TCPServer - Golang

package main

import "net"
import "fmt"

func main() {
    port := 8080

    fmt.Printf("Launching TCP server port %d\n", port)

    ln, err := net.Listen("tcp", fmt.Sprintf(":%d", port))
    if err != nil {
        fmt.Println(err)
        return
    }

    for {
        conn, err := ln.Accept()
        if err != nil {
            fmt.Println(err)
            continue
        }

        go handleRequest(conn)
    }
}

func handleRequest(conn net.Conn) {
    defer conn.Close()

    remoteIP := conn.RemoteAddr().String()

    buf := make([]byte, 1024)

    fmt.Println("--------------------")
    fmt.Println(remoteIP)

    for {
        reqLen, err := conn.Read(buf)
        if err != nil {
            //fmt.Println(err)
            break
        }

        if reqLen > 0 {
            fmt.Printf("%s(%d)\n", string(buf[:reqLen]), reqLen)
        }
    }

    conn.Close()

    fmt.Println("socket closed")
}


TCPSend - DOS (僅列出修改部份,其他都是原本的)

int sendTCP(char *msg, int len)
{
  int sendLen = 0;
  int rc;

  while (sendLen < len)
  {
    rc = sock->send( (uint8_t *)(msg+sendLen), len-sendLen);
    PACKET_PROCESS_SINGLE;
    Arp::driveArp( );
    Tcp::drivePackets( );

    if (rc > 0) {
      sendLen += rc;
    }
    else if ( rc == 0 ) {
      // Out of send buffers maybe?  Loop around to process packets
      printf("sock->send error ?\n");
      return -1;
    }
    else {
      return -1;
    }
  }

  return 0;
}

int main( int argc, char *argv[] ) {

  // Initialize TCP/IP
  if ( Utils::parseEnv( ) != 0 ) {
    exit(1);
  }

  if ( Utils::initStack( 1, TCP_SOCKET_RING_SIZE ) ) {
    fprintf( stderr, "\nFailed to initialize TCP/IP - exiting\n" );
    exit(1);
  }

  // From this point forward you have to call the shutdown( ) routine to
  // exit because we have the timer interrupt hooked.

  // Start
  Utils::Debugging |= 0xff;
  ServerPort = 8080;
  strcpy(Hostname, "192.168.11.9");

  fprintf( stderr, "Server: %s:%u\n", Hostname, ServerPort);

  if ( resolve(Hostname, HostAddr) ) shutdown( 1 );

  if ( connectSocket( ) ) shutdown( 1 );


  // send
  int rc;
  char data[64];
  int sent_bytes;
  int sendstrlen;

  printf("input message to send or 'q' to exit \n\n");

  while (1)
  {
    memset(data, 0x00, sizeof(data));
    fgets(data, sizeof(data) - 1, stdin);
    if (data[0] == 'q')
    {
      printf("ready to exit connection\n");
      break;
    }

    sendstrlen = strlen(data);
    if (sendstrlen > 0 && sendstrlen < 64)
    {
      rc = sendTCP(data, sendstrlen);
      printf("rc = %d \n", rc);
    }
  }

  shutdown( rc );
}

2017年1月5日 星期四

The comparison of Excel Librarys that written with different program language


最近幫人寫工具
遇到一些 Excel Library 相容性問題
故試了好幾種語言的 Excel Library
備忘一下