由於機車的微軟沒有公開 Spec
故 NTFS 的 parsing 都是由高手努力推斷出來的結果
底下是建議的閱讀順序
先從微軟的文章了解基本資訊
https://technet.microsoft.com/en-us/library/cc781134(v=ws.10).aspx
也可以看看 wiki
https://zh.wikipedia.org/wiki/NTFS
再來可以看 Brian Carrier 所撰寫的《File System Forensic Analysis》一書
很多網路上看到的簡報都會參考它
最後則是 Linux 社群的研究結果,也是目前我覺得最正確的 Spec
https://sourceforge.net/projects/linux-ntfs/files/NTFS%20Documentation/0.6/
2016年10月5日 星期三

NTFS $MFT parsing

$MFT 是 MFT 裡的第一筆 Entry,作用是描述 MFT 本身,總共有 4 個 attributes。
藍色代表 MFT Entry Header
綠色代表 Attribute Header
粉紅色則是 Attribute 內容
底下是人工 parsing 的結果
[Entry Header]
Length 0x0198
The Entry End is 0xFFFFFF (為了 8 的倍數,後面補了 0x00000000,故長度是 0x0198)
The next attribute id is 0x0007
0x10 -- 0x0000
0x30 -- 0x0003
0x80 -- 0x0006
0xB0 -- 0x0005
[0x10] -- $STANDARD_INFORMATION
The file creation time is "1601-01-01, 00:00 UTC" + (0x01D21B378809B277 / pow(10,7)) (seconds)
[0x30] -- $FILE_NAME
The name of this entry is $MFT, it has 4 characters, it's lenth is 2 x 4 = 8.
[0x80] -- $DATA, non-resident, no name
Note: not every 0x80 attribute is non-resident, we need to check non-resident flag.
starting VCN 0x00
last VCN 0x3F
offset to the Data Runs 0x40
Data Runs
21 40 BD 04 00 00 00 00
21 40 BD 04 - 00 00 00 00 (group)
first one is header, it means one byte length, two byte offset.
length 0x40
offset 0x04BD
Because $MFT is the description of MFT. this 0x80 attribute tells us that
MFT is at 0x4BD000 (0x04BD x 4096) and the length is 262144 bytes (0x40 * 4096).
We can use starting VCN and last VCN to check this length (0x00 - 0x3F, length 0x40) too.
Move to next group
21 40 BD 04 00 00 00 -> 21 40 BD 04 - 00 00 00 00
Because header is 0x00, it only has one data run.
[0xB0] -- $BITMAP, non-resident, no name
starting VCN 0x00
last VCN 0x01
offset to the Data Runs 0x40
Data Runs
21 01 BC 04 11 01 FF 00
21 01 BC 04 - 11 01 FF - 00 (group)
Run1 21 01 BC 04
length 0x01
offset 0x04BC
Run2 11 01 FF
length 0x01
offset 0x05BB (0x04BC + 0xFF)
從 Run1 得知,data 位於 0x4BC000 (0x04BC x 4096)
每 1 個 bit 代表 1 個 Entry,1 代表使用中,0 則是未使用
Dump 出來的資料如下
01 9F FF 00 FF FF
前 16 筆 Entry 是 metafile
第 25 筆 Entry 開始是 File System 的檔案或目錄
連續的17筆資料中,有 2 筆是未使用的
如果跳到該筆 Entry,可以從 Entry Header Flag 確認,其值應該為 0x00
至於 Run2,dump 出來的值都是 0x00
故只有在 MFT 前 41筆 Entry 是有資料的 (包含保留及空的未使用)

2016年8月24日 星期三
npm uninstall all
使用 node.js 時,如果想要一口氣刪除所有的 module,可以使用下列方式
進到 node_modules 資料夾
使用 PowerShell 執行下列命令
npm uninstall (Get-ChildItem).Name
進到 node_modules 資料夾
使用 PowerShell 執行下列命令
npm uninstall (Get-ChildItem).Name
2016年8月19日 星期五
nginx 設定 PHP
假設在 nginx 設定 php 遇到奇怪的問題
比如 query string , path info 等值取不到
大部份都是設定檔的問題
其中順序也會影響
留著備忘參考
location ~ [^/]\.php(/|$) {
fastcgi_split_path_info ^(.+?\.php)(/.*)$;
if (!-f $document_root$fastcgi_script_name) {
return 404;
}
fastcgi_buffer_size 128k;
fastcgi_buffers 256 16k;
fastcgi_busy_buffers_size 256k;
fastcgi_temp_file_write_size 256k;
fastcgi_read_timeout 3610;
include fastcgi_params;
fastcgi_param SCRIPT_FILENAME $document_root$fastcgi_script_name;
fastcgi_param SCRIPT_NAME $fastcgi_script_name;
fastcgi_param PATH_INFO $fastcgi_path_info;
fastcgi_index index.php;
fastcgi_pass 127.0.0.1:9090;
比如 query string , path info 等值取不到
大部份都是設定檔的問題
其中順序也會影響
留著備忘參考
location ~ [^/]\.php(/|$) {
fastcgi_split_path_info ^(.+?\.php)(/.*)$;
if (!-f $document_root$fastcgi_script_name) {
return 404;
}
fastcgi_buffer_size 128k;
fastcgi_buffers 256 16k;
fastcgi_busy_buffers_size 256k;
fastcgi_temp_file_write_size 256k;
fastcgi_read_timeout 3610;
include fastcgi_params;
fastcgi_param SCRIPT_FILENAME $document_root$fastcgi_script_name;
fastcgi_param SCRIPT_NAME $fastcgi_script_name;
fastcgi_param PATH_INFO $fastcgi_path_info;
fastcgi_index index.php;
fastcgi_pass 127.0.0.1:9090;
Golang on Ubuntu
假設在 Ubuntu 安裝完 Golang
可以用 go env GOROOT
來確定 golang 安裝的路徑
接著執行下面指令,就可以開始使用 golang 了
export GOROOT=/usr/loca/golang-1.6(假設查出來是此目錄)
export GOPATH=$HOME/GoHome
可以用 go env GOROOT
來確定 golang 安裝的路徑
接著執行下面指令,就可以開始使用 golang 了
export GOROOT=/usr/loca/golang-1.6(假設查出來是此目錄)
export GOPATH=$HOME/GoHome
export PATH=$PATH:$GOROOT/bin:$GOPATH/bin
2016年8月16日 星期二
Alternate Domain Names
一般來說,在設定 CDN 時有 2 種方式:
1. 直接將 CDN 給的 domain 拿來做 URL,假設 CDN 的 domain 是 abc.com,則要做 CDN 的檔案的 URL 都是 abc.com/xxxx。
2. 仍然使用自己的 domain,假設自己的 domain 是 def.com,需要在 DNS 服務提供者建立一筆 CNAME record,此時 def.com/xxx 的 URL 便會導向到 abc.com/xxx。
1. 直接將 CDN 給的 domain 拿來做 URL,假設 CDN 的 domain 是 abc.com,則要做 CDN 的檔案的 URL 都是 abc.com/xxxx。
2. 仍然使用自己的 domain,假設自己的 domain 是 def.com,需要在 DNS 服務提供者建立一筆 CNAME record,此時 def.com/xxx 的 URL 便會導向到 abc.com/xxx。
2016年7月29日 星期五
Android OTA 差分包
1. Copy "/source/android/out/target/product/xxx/obj/PACKAGING/target_files_intermediates/xxx.zip" to old.zip
2. Modify source code and rebuild project
3. Copy "/source/android/out/target/product/xxx/obj/PACKAGING/target_files_intermediates/xxx.zip" to new.zip
4. Move to "/source/android" path, create "OTA" folder, copy old.zip and new.zip to this folder
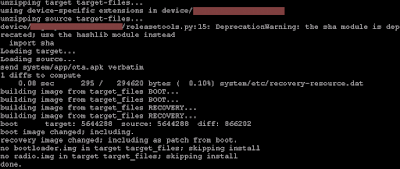
5. Run "./build/tools/releasetools/ota_from_target_files -i OTA/old.zip OTA/new.zip OTA/diff.zip"
6. If there is no error, you will see the below message
1 的檔案是製作 OTA 檔案過程中的產物,差分包需要這個才能產生 patch,故不能拿平常 build 出來的 OTA 檔案。
另外,由於是用 old.zip 比較出來的差分包,故設備上的版本需和 old.zip 一樣,不然升級會失敗。
2. Modify source code and rebuild project
3. Copy "/source/android/out/target/product/xxx/obj/PACKAGING/target_files_intermediates/xxx.zip" to new.zip
4. Move to "/source/android" path, create "OTA" folder, copy old.zip and new.zip to this folder
5. Run "./build/tools/releasetools/ota_from_target_files -i OTA/old.zip OTA/new.zip OTA/diff.zip"
6. If there is no error, you will see the below message
1 的檔案是製作 OTA 檔案過程中的產物,差分包需要這個才能產生 patch,故不能拿平常 build 出來的 OTA 檔案。
另外,由於是用 old.zip 比較出來的差分包,故設備上的版本需和 old.zip 一樣,不然升級會失敗。

訂閱:
文章 (Atom)